Over the course of this project I've had a lot of issues, some of them caused by my own negligence or lack of knowledge, and some beyond my control. However I feel that I've learnt a lot over the course of this module and a lot of the mistakes I've made I've learnt from and hopefully won't have to repeat in the future. Overall I wish I'd pushed myself more at the beginning of the project to get work done rather than leaving huge chunks of work until the wrong side of Easter. I also felt some of the projects could have been managed better, although I think in the end the collaborative projects I was working on were a success.
Echoes: Animations
For two projects worth of my production module I produced 40+ seconds of animation for the third year game project titled Echoes. I felt that a lot of my animations for this project suffered due to lack of planning and reference. As dragons don't exist I had to resort to footage of bats for reference, as their anatomy most closely matched Ruth's dragon design. The animations that were required of me also changed several times over the course of the project, depending on what we though we needed for the game, and this resulted in me not having enough time or reference for some of my animations.
Despite starting many of my game animations early on in the project I struggled to get a lot of them out of the blocking phase and as a result many of them don't seem to have improved much, or have only improved slightly between this pass and the final animations that I handed in. I could have avoided this by finding more reference or by re-animating from scratch some of my cycles to see if I found a better way of doing things the second time around.
In the end I did do this with some of my animations, such as the centaur turn on the spot. I had to redo this particular animation due to a problem in the rig, when rotating the body the mesh doesn't follow the spine correctly, resulting in a crumpled mesh. To get around this I set up a camera and rotated that instead of the character so that it appeared to be rotating on the spot. As the global movements and rotations on the rigs are removed in order to be taken into the game engine this didn't present a problem to the unity team. I had a few other issues with this rig, the lack of FK arms weakened some of my animations, however apart from these issues this rig and the others I had to use for the project worked well.
The project was managed well overall as the final result was a working game. In terms of the animation team though, I felt as though we could have benefited from having somebody take on a more active role as an animation director, as the artists seemed to receive more guidance and deadlines than we did. We did however hold weekly meetings where we looked at each others work and made suggestions for improvements, and I found that this helped improve my work a lot.
At the end of the project I only feel confident in half of the animations I produced for the game, the others I still feel need a fair bit of work done to them. In addition to struggling at getting out of the blocking phase I also found it difficult when it came to giving my animations a final polish, I was being too precious in some areas and not breaking some aspects of the animations in order to fix more pressing problems.
Echoes: Lighting
My lighting project consisted of lighting and rendering two cinematics for use in the Echoes game. The art assets used in the cinematics are the same as the ones used in game and the animations and cameras were provided to me by Hollie. The main problem I encountered with this project was the fact that I'd never done any form of lighting in Maya before, and it had been a year since I had done a similar project in 3ds Max. As a result a lot of my time for this project was taken up with learning how to light a scene in Maya based off of my previous knowledge and tutorials that I found online.
After I'd watched a sufficient amount of tutorials I lit my scenes using a combination of the techniques I'd learnt. I had a few issues concerning the use of certain settings within Maya, such as having to turn on alpha is luminescence to use opacity maps properly and setting bump maps to tangent space normals. Most of these problems were solved via googling for a solution, however at several points in the project my progress was hampered on several occasions when key software on my computer failed to work and I spent several hours fixing problems with Maya, Photoshop and After Effects on seperate occasions.
I am fairly happy with the outcome of my lighting project, however if I had starting researching the area earlier on in the project then I might have been able to use some more advanced techniques and fix some of the problems I had, as I noticed after rendering out all of my files that some of my render passes had minor errors caused by the alpha planes in the scene or the use of incorrect settings.
As far as getting assets for my final renders went I had some difficulty getting animations and textures from the people I was working with. The animations in the cinematics are not the final ones due to a scheduling conflict that could have been avoided if the project were planned better. I also did not receive a texture for one of the characters until very late in the last week. This caused an issue when I came to render out my passes, as it was so close to the deadline a lot of other people were using the render farm, and even though as a third year I was supposed to receive priority, I received my files too late to composite the entire sequence. I could have avoided this by trying to finish off my scene and submitting my files earlier, however this would have been difficult without the final texture as I would have needed to make changes to the lighting set up and redo a section of my work anyway.
Personal project
In my opinion my personal project is the weakest area of my submission. It was my intention to finish this part of the project first, however I got caught up doing extra work for pre-production and then bogged down with working on my dissertation, and as a result I started this part of the project much later than planned.
I liked the sound clip I chose as it gave me a lot of freedom with what I could do with it, and I don't feel as though I fully took advantage of this. Like my game animations, I feel as though this project could have benefited from better planning and more exploration of ideas early on. Acted pieces with dialogue are an area I've always struggled with, and in hindsight it might have been more beneficial for me to work on more body mechanics pieces in order to improve my understanding of the basic fundamentals of animation.
Looking back on it now it's clear I need to spend a lot more time on this piece of work. The lip-syncing mostly matched up in Maya, however upon rendering it out I've noticed that it's all of the place, and I could have avoided this by doing regular playblasts. Another issue I noticed is the camera, the silent character is meant to be cut off so that there wasn't a need to spend as much time animating him, however in the shot I handed in he can be clearly seen sitting still and unmoving.
Showing posts with label Production. Show all posts
Wednesday, 22 May 2013
Sunday, 12 May 2013
Double Acted: New cameras
Part of my feedback for my double acted performance piece was to set up new cameras and stage the scene differently so that the character with no dialogue wouldn't be shown onscreen for as long. This makes it easier for me as I can then focus on the other character who talks for the duration of the clip, and I don't have to try and make the other character interesting.
Monday, 6 May 2013
Game Anims: Progression
This is a reel showing a section of my work from both before and after the first submission deadline. Some of these animations have been improved upon since then and some of them still need some more work as they don't deviate much from the original blockouts.
Sunday, 5 May 2013
Lighting: Maya qwerks
Thanks to a bit of miscommunication amongst us I've had to redo a few things in my lighting files. But I've got the files back off Hollie now, who had to update the cameras and animations, and Ruth who need to transfer the UVs for the bark basher. Whilst I was fixing my files I noticed a few qwerks in Maya that prevent some of the texture files from rendering correctly. If the option Alpha is Luminescence is not checked on the Color Balance option for the alpha texture, then the render will not work correctly and the transparent areas will show. For bumps map, if the attribute is not set to Tangent Space Normals as in the screenshot below, then Maya will use the bump map incorrectly and the render turns out pretty ugly.
Saturday, 4 May 2013
Double Acted: Blockout
As well as the game animations I also handed in the blockout of my double acted piece for the first submittal. I haven't got as far with this piece of animation as the game animations need to be finished first to be implemented in the game. I think I still need to make some changes on some of the poses in this piece, but I've received some useful feedback from my tutors so I'll be improving this over the coming week.
Game Anims: First submittal
A couple of weeks back we handed in our work so far for the first submittal deadline. I forgot to upload this at the time, but this is the video of all my game animations as they were at that point. Since then I've improved on them further, but some of them are already working nicely such as the dragon fly forwards, whereas others like the fae idle clearly need more work.
Tuesday, 30 April 2013
Lighting: Render farm tests
Today I went down to one of the medialabs in our uni to test out rendering my files on the render farm. After a few false starts with not setting up the files correctly, I managed to get the correct settings and it took about an hour to render the summer cinematic at half the required resolution. Taking into account the fact that the winter cinematic is longer and I need to render passes as well, I've allocated myself three full days using the render farm to get everything rendered, which should be enough time.
In order the use the render farm the file must first be fully set up in Maya, selecting the the correct render settings including camera, resolution etc. Then the information must be exported into a .mi file which can be opened in Qube and added to the render queue.
Tuesday, 23 April 2013
Lighting: Test renders
Tomorrow is the 1st submittal deadline for our major project. So far I've devoted most of my time to doing the game animations for Echoes since they need to be handed over to the Unity team first. The purpose of this hand in is to allow our tutors to give us written feedback on our work thus far and so we can improve on it before the final deadline.
Anyway, here are some test renders of the summer cinematic using the HDR image I created. I'm fairly happy with the result as I should be able to achieve the final look that I want by combining this with a basic light set up.
Sunday, 21 April 2013
Lighting: HDRI
To light the cinematics, I decided to use image based lighting in Maya as a starting point. To do this I needed to go out on location and take pictures of a light probe at different exposures to get the required lighting information. I went the the woods at Stansted Forest on two different occasions when the weather was different to get a unique HDR image for each scene.
For each scene I took 19 photos of the light probe at different exposures in order to get an accurate HDR image.
Below are image of the HDR image working in Maya for the summer cinematic. The first image shows it working in the viewport and casting light on the cube, and the second shows a rendered metallic sphere reflecting the image back.
For each scene I took 19 photos of the light probe at different exposures in order to get an accurate HDR image.
Below are image of the HDR image working in Maya for the summer cinematic. The first image shows it working in the viewport and casting light on the cube, and the second shows a rendered metallic sphere reflecting the image back.
Before taking the HDR image into Maya though, the photographs must first be converted into a HDR file using Photoshop and HDRShop. To do this I opened Photoshop and selected File > Automate > Merge to HDR Pro and selected the photos. Photoshop then automatically aligns the photographs in case the tripod was knocked when taking the images.
Once this is done, the image needs to be cropped down to a square containing the light probe and saved out as a HDR image. I then opened this file in HDRShop and selected Image > Panorama > Panoramic Transformations. The image must be converted from a Mirrored Ball to Latitude/Longitude, and then saved out again as a HDR file.
This stretches out the image onto a rectangle which is then opened up again back in Photoshop. The final step is to paint myself out of the image before saving it for a third time as a HDR, ready to be opened in Maya.
Saturday, 20 April 2013
Double Acted: Setting the scene
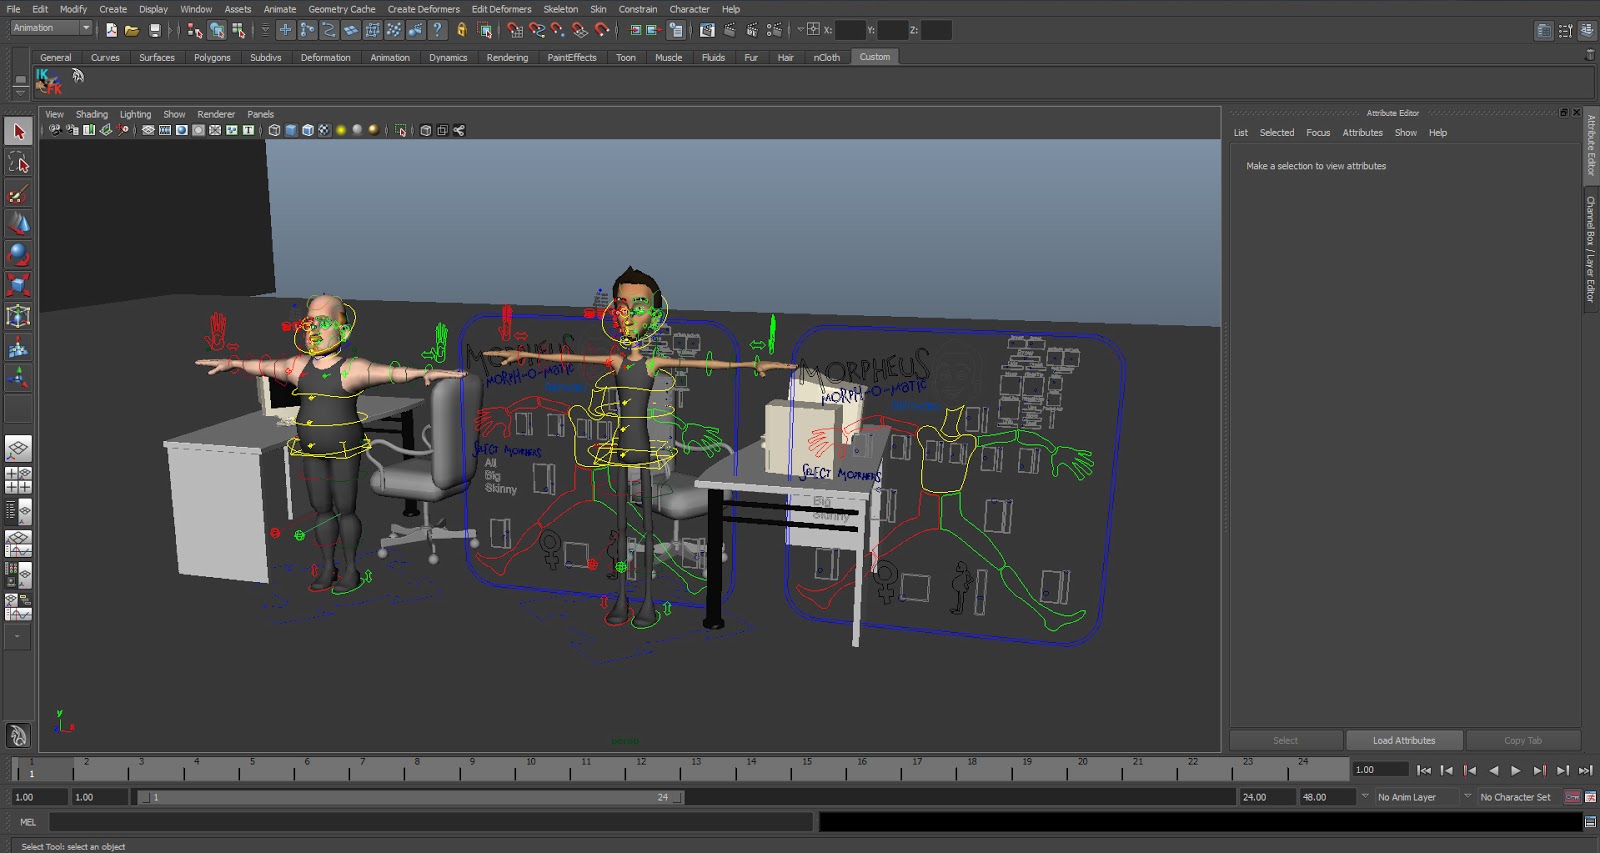
For my double acted piece I chose to use the Morphy rig created by Josh Burton as it's a very flexible rig and I've used it in the past so I'm familiar with the controls. After tweaking the two rigs to my liking in separate files, I referenced them into my scene file which I've populated with prop models from sites such as Turbosquid and Creative Crash.
I wanted to keep the chairs as separate objects, so that I can animate a little bit of bounce in the seat separate from the base when a character sits in or gets out of a chair. To do this I simply set up a parent constraint so that I can still control the chair as a whole when moving or rotating it in the scene, but which I can turn off when need be.
When I came to animated my blockout of the scene I came across a problem, my audio clip wouldn't play in Maya, despite the fact that it was a wav and appeared to have the right settings. I found a replacement online to use instead, this too was a wav, but for some reason this one played fine in Maya.
I wanted to keep the chairs as separate objects, so that I can animate a little bit of bounce in the seat separate from the base when a character sits in or gets out of a chair. To do this I simply set up a parent constraint so that I can still control the chair as a whole when moving or rotating it in the scene, but which I can turn off when need be.
When I came to animated my blockout of the scene I came across a problem, my audio clip wouldn't play in Maya, despite the fact that it was a wav and appeared to have the right settings. I found a replacement online to use instead, this too was a wav, but for some reason this one played fine in Maya.
Thursday, 18 April 2013
Lighting: Skyboxes
So for my lighting project I need a background or a skymap for the sky. For the corresponding scene in Unity we're using a cubemap, so Ruth sent me the texture files as then the cinematic would match up more with the gameplay environment. However cubemaps can only be viewed correctly from fixed camera angles, and this presented a problem as each scene contained multiple camera angles.
As seen in the picture above, I attempted to add the cubemap textures to an envcube material in Maya, but unless lined up correctly the illusion was ruined, and when rendered the cube's seams showed up.
I looked into a few workarounds for this, and found that a cubemap could be transformed into a spherical image in HDRshop and then applied in Maya using the image based lighting environment option. However this required a lot of manual work and the end result would not be worth it compared to simply using a suitable image to begin with. With this in mind I looked online for a an image I could use as a skydome, which is a half sphere that surrounds the scene. However using a skydome can create more problems, as if all of the settings are not calibrated correctly the skydome can end up casting unwanted shadows on the scene or interfering with final gather.
After considering these options I've decided to simply use a background plate attached to each camera, or to add the sky image after rendering in After Effects. This means that the cinematics won't match up with game environments as well as I'd hoped, but considering the differences in lighting and assets anyway this is the best option as it'll allow me more time to tweak the lights and render settings.
As seen in the picture above, I attempted to add the cubemap textures to an envcube material in Maya, but unless lined up correctly the illusion was ruined, and when rendered the cube's seams showed up.
I looked into a few workarounds for this, and found that a cubemap could be transformed into a spherical image in HDRshop and then applied in Maya using the image based lighting environment option. However this required a lot of manual work and the end result would not be worth it compared to simply using a suitable image to begin with. With this in mind I looked online for a an image I could use as a skydome, which is a half sphere that surrounds the scene. However using a skydome can create more problems, as if all of the settings are not calibrated correctly the skydome can end up casting unwanted shadows on the scene or interfering with final gather.
After considering these options I've decided to simply use a background plate attached to each camera, or to add the sky image after rendering in After Effects. This means that the cinematics won't match up with game environments as well as I'd hoped, but considering the differences in lighting and assets anyway this is the best option as it'll allow me more time to tweak the lights and render settings.
Wednesday, 17 April 2013
Lighting: Scene set up
When I first received the scene with the cameras set up from Hollie, none of the textures showed up as they were linked to a harddrive on another computer. I started to manually relink all of the textures, however this caused another problem as some of the files had the same filename. This led to Maya trying to fix some of the broken links for me once I had relinked one, and I ended up with the dragon textures on the trees.
In order to get over this problem I renamed the textures with clashing names and saved all of the files used in the scene to a new directory. I then set the project in Maya so that when the scene file is opened on another computer Maya will open the texture files from the scene directory rather than from the original pathname.
Sunday, 3 March 2013
Production: Summary
The work I did for the pre production module feeds directly into the production module I'll be focusing on until the end of the year. Since most of my posts with be about this module I figured it would be a good idea to post a brief summary first to explain what I'm working on.
Production, or major project as the module is sometimes called, is a submission consisting of four main components. Two of these components must be collaborative projects with other students or industry, and each one is usually specific to the student's chosen pathway. For example, a modeler might model and texture a character as one project, and an animator may choose to rig a character or produce a piece of animation as one project's worth of work.
For my major project work I'm producing three pieces of collaborative work on the game Echoes with my classmates, and one personal project.
Creative Creature
This project consists of 15-20 seconds of animation to be used in game on the dragon character created by Ruth Beresford and rigged by Joe Hornsby.
Bodymechanics
Again this project is 15-20 of game animations, this time for the fae and centaur characters made by Dean Paupe and rigged by Joe and Matt Watson respectively.
Advanced Lighting
For this project I am lighting two scenes in Maya for use as game cinematics using environments created by Ruth and animations provided by Hollie Sheppard.
Double Acted
For my personal project I have taken a 15 second sound clip and I am animating a small scene between two characters to the dialogue.
Production, or major project as the module is sometimes called, is a submission consisting of four main components. Two of these components must be collaborative projects with other students or industry, and each one is usually specific to the student's chosen pathway. For example, a modeler might model and texture a character as one project, and an animator may choose to rig a character or produce a piece of animation as one project's worth of work.
For my major project work I'm producing three pieces of collaborative work on the game Echoes with my classmates, and one personal project.
Creative Creature
This project consists of 15-20 seconds of animation to be used in game on the dragon character created by Ruth Beresford and rigged by Joe Hornsby.
Bodymechanics
Again this project is 15-20 of game animations, this time for the fae and centaur characters made by Dean Paupe and rigged by Joe and Matt Watson respectively.
Advanced Lighting
For this project I am lighting two scenes in Maya for use as game cinematics using environments created by Ruth and animations provided by Hollie Sheppard.
Double Acted
For my personal project I have taken a 15 second sound clip and I am animating a small scene between two characters to the dialogue.
Subscribe to:
Posts (Atom)